- Home Page
- Cake Decorating Techniques & Tips
- Gum Paste Teacup
Gum Paste Teacup Tutorial
This tutorial for gum paste teacup is long overdue. I made this teapot cake quite a while back with the little teacups. And while I've always meant to include a step-by step guide on how to make the gum paste teacups, life got in the way and I somehow forgot to make this tutorial.
This post may contain affiliate links, which means I'll receive a commission if you purchase thru my links, at no extra cost to you. Please read the PRIVACY POLICY AND DISCLOSURE for more information.

Just a note,these babies need to be made ahead to allow for drying time. Make it at least a week before using it.
GUM PASTE TEACUP TUTORIAL
YOU WILL NEED:
Gum Paste
Mini Rolling Pin
Mini Wonder Mold Pan
Gum Paste Dresden Tool
Gum paste ball tool
Royal icing
Knife
Cornstarch
METHOD
Dust the mini wonder mold pan heavily with cornstarch
Roll out the gum paste to about 1/8" thickness or less. The thinner it is, the more realistic it will look.
Place the rolled gum paste in the doll pan. I used the back of my hand to carefully guide it into the pan.


Cut excess gum paste with knife.

Thin out the top edges of the teacup with your finger.

This step is optional, but I like a whimsical looking teacup so I created a wave on top using a gum paste dresden tool.

Create a teacup base by creating a ring of gum paste.

To know how big you need it be you need to place it around the base of the pan. This way will also form fit the ring to the cup.

Again this part may vary, you can leave the ring as is or make different styles with it. So to recreate the wave on the base of the cup, I pressed the gum paste ball tool on equal intervals.

For the handle, first I drew a sketch of it first on paper. Then I rolled a piece of gum paste into a log and placed it on top of my sketch. I didn't want my gum paste to touch the paper, so I placed a piece of wax paper on top of the paper.

I then followed the sketch cut the excess with a knife. Let dry on a piece of soft foam so that one side would not flatten out.

Let the pieces dry for about 2 days. After the first day, the cup part is a bit dry but not completely. Carefully take it out of the pan and let it continue drying upside down.
Assemble the pieces together by "gluing" them with royal icing. For the handle, let it rest against something, in my case I just set it against the sides of the the cookie sheet pan. This way it is the handle is pushed against the cup while drying.

If you find that the gum paste teacup is not very smooth of a bit wrinkled, use a thin royal icing and sort of spackle the cup to smooth it out.
Decorate as you wish. You can use petal or metallic luster dusts to decorate. For this cup I used gold dust mixed with lemon essence and used it to highlight the edges. I colored the royal icing to pink and green and used a round tip to pipe three pink dots in to a triangle. I also piped pink dots on the bottom to decorate it. I also used a leaf tip to pipe three small leaves around the dots.
For the doilies, I used a round cutter with scalloped edges. I then used the dresden tool to make some texture near the edges.


Let dry for about a day. Then pair it with a teapot cake and you are now ready for a tea party!
You might also like:


Gum Paste Teacup Top
- Home Page
- Cake Decorating Techniques & Tips
- Gum Paste Teacup
The images, tutorials and content on make-fabulous-cakes.com are protected by copyright laws. DO NOT distribute or copy the content without written permission. DO NOT edit, crop, or remove watermarks from any image or video. If you intend to use any of the text, templates or images within, it must be linked back to this site with credit given to www.make-fabulous-cakes.com. For questions contact us HERE.
Disclosure: Please note some of the links in this post may be affiliate links, I will earn a commission if you decide to make a purchase. This doesn’t cost you anything additional and I truly appreciate this support, thank you!

Hi, I'm Darlene. I'm the creator, photographer, baker, recipe tester of Make Fabulous Cakes. Welcome to my sweet world!
MORE ABOUT ME >>
most popular posts
 |
 |
 |
 |
 |
 |
Recent Articles
-
Russian Piping Tips Guide plus Video
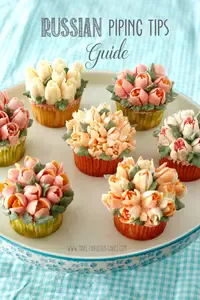 Russian Piping Tips Guide - a guide on how to use these fun tips, where to get them, which buttercream to use and how to color it plus video.
 -
Top Ten Cake Baking Tips
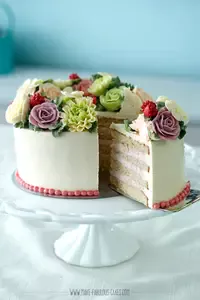 Top ten cake baking tips for better cakes.
 -
Fabulous cake decorating ideas, Recipes and Cake Pictures.
Cake decorating ideas with lots of cake tutorials, cake recipes and inspiration for beginners and the more experienced cake decorator.
online Classes

Featured in:
 |
 |
 |


