- Home Page
- Flower Cakes
- Flower Hat Box Cake
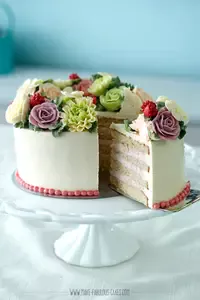
BUTTERCREAM FLOWER HAT BOX CAKE TUTORIAL
This buttercream flower hat box cake will make a gorgeous centerpiece for an elegant celebration. It's the perfect cake to celebrate Mother's Day, a birthday, teatime or anytime, no occasion needed :)
This post may contain affiliate links, which means I'll receive a commission if you purchase thru my links, at no extra cost to you. Please read the PRIVACY POLICY AND DISCLOSURE for more information.

Most flower hat box cakes with this style are mostly made with fondant. The "lid" in the bottom is usually made with fondant.
In this tutorial I want to show you how to make it in buttercream, flowers, lid and all. It's not as hard as you think!

For this cake, I was inspired with the flavours of the popular drink, mimosa, a cocktail of orange juice with a splash of champagne or for some people champagne with a splash of orange juice (no judgements here).
A mimosa usually accompanies breakfast or brunch and a good excuse to start imbibing alcohol early 😁
I used one recipe of The Ultimate Vanilla Cupcake and added some orange zest in the batter and baked it in two 6" round pans.
I have to sneak in some champagne in there so I added it in the simple syrup. Simple syrups are a great way to add flavours into the cake. You can use rhum, cognac or even just vanilla. And of course it also adds moisture to the cake.
To make the the orange flavour more pronounced I added marmalade into some buttercream for the filling.
I love how the flavours came together and it really is a great cake to bring to a brunch or afternoon tea.
Watch the video below on how to make the buttercream flower hat box cake
flower hat box cake tutorial
TO MAKE THE HAT BOX CAKE YOU WILL NEED:
Two 6”
cakes
Simple syrup (equal parts sugar and water boiled for one minute)
1 recipe Italian Meringue Buttercream
Cake board
Cake Decorating Turntable
Serrated knife
Offset spatula
Bench scraper
Pastry tip 104
Pastry bag
Couplers
Flower nail
Wilton Pink gel color
Wilton Peach gel color
Wilton Moss gel color
Mini offset spatula
Wax Paper
Building the Flower HAT BOX Cake
First, cut of the domes of the cakes using a serrated knife and set the domes aside (to be used later for the top of the cake). Cut both cakes in half horizontally.


Place a cake cut side up on the cake board or serving platter. Put some buttercream in a pastry bag with the coupler and pipe a dam of buttercream all around the cake. Sprinkle the cake with simple syrup.


Add in the filling and spread evenly to cover the top of the cake. Place another cake on top and do the process a couple more times ending with a layer of cake on top.


Using an offset spatula spread and cover the top of the cake with an even mount of buttercream. Cover the sides as well and make it smooth using a bench scraper.


Use the offset spatula to smoothen the top of the cake. Chill the cake in the ridge while you make the buttercream roses next.
 |
 |
Pipe the Buttercream ROse
For the roses I wanted it to have different tones of peach colour so I used three shades of buttercream - uncolored, light peach and peach mixed with some pink. I added all three shades in the pastry bag fitted with a pastry tip 104.
Using all three shades at the same time will pipe roses of different colours and this is exactly the effect we are going for so that there will be some dimension to the flowers.

I piped mostly large roses for this cake but I also piped e few medium sized ones and small ones too. Putting the flowers together on the cake is sometimes like a puzzle, and you need to plug in just the right size of flower in the space.
I keep the buttercream roses at room temperature; I find that it's easier to push in the flowers together as they are soft and so there's less spaces between the flowers.
Some people may find doing it this way hard but you can also chill the flowers. Chilling the flowers so they get hard and easier to pick up and place on the cake maybe easier for some. But the spaces between the flowers maybe bigger. You can just pipe some leaves to cover up the spaces.

Piping the leaves
For the leaves I used moss green gel colour and made different shades as well and placed them all together in the bag. I used the tip 104 and piped it into a closed v shape on top of a piece of wax paper.

I made a few piped leaves and place them on board to put in the freezer. I like to freeze them solid so I could just easily peel them off the wax paper and place directly on the cake.

adding the Flowers on the hat box cake
Now back to the cake. We need to make the top of the cake appear fuller and we can do this in a couple of ways.
We can add more buttercream on top and shape it like a dome. To be honest, I'm not too crazy doing it this way coz once we add the flowers there's like a TON of buttercream on top of the cake. But sometimes we just do this if we have to.
Or even better yet use the cake domes that we cut and saved earlier and place that on top of the cake.
Make sure the dome is slightly smaller than the cake to create sort of a ledge on the side. Having that ledge will ensure that the flowers will sit on it and not slide on the sides of the cake.
Place one dome, cover it with an even layer of buttercream then stack the second dome.

Cover the entire top with a thin layer of buttercream. It doesn't need to be thick as this part will be covered with flowers (again it will have tons of buttercream after the adding the flowers).

With a flower lifter, carefully place the flowers on top of the dome. I started with the lighter shade roses on top of the cake.

Then added the darker shades after.
Don't be afraid to push up the flowers with each other.

Pipe more flowers as needed. Pipe the size that you need to plug into the space.

Take the leaves out of the freezer and start inserting it all around the cake. Make sure you work fast so it doesn't start melting while you are handling it. Pop back in the freezer if it starts getting soft.
And make sure the flowers are soft so you can insert the leaves.
Alternatively you can also just pipe the leaves directly on the cake using a leaf tip like a #352.

Making the Hat box Lid
Time to make the lid at the bottom of the cake. In hindsight I should have done this part first before adding the flowers and the leaves, as I was hitting some of the leaves while I was adding the lid with a spatula. Oh well, you live and learn.

First, cut strips of 1" wax paper. Add a strip at the bottom (this will act as a spacer) then add another strip on tip of the first one. Then carefully peel off the bottom strips of paper to reveal 1" of space.
Make sure the top strip is snug and secure on the cake.

With a small offset spatula, spread a different coloured buttercream all around the cake. Make sure that it goes above the strip of wax paper. Try to make it an even layer about 1/4" as it needs to look substantial like a lid.

When you have finished smoothing all around, carefully peel off the strip of wax paper on top. This should create a nice straight line of buttercream for the lid.

And there you go - a buttercream flower hatbox cake.

Enjoy!

I hope you enjoyed this tutorial. Til next time!
Cheers from my kitchen,

IF YOU WANT TO LEARN MORE BUTTERCREAM FLOWERS
Now, if you want to learn more on how to make beautiful buttercream flowers, check out my online class Make Fabulous Buttercream Flowers!

The images, tutorials and content on make-fabulous-cakes.com are protected by copyright laws. DO NOT distribute or copy the content without written permission. DO NOT edit, crop, or remove watermarks from any image or video. If you intend to use any of the text, templates or images within, it must be linked back to this site with credit given to www.make-fabulous-cakes.com. For questions contact us HERE.
Disclosure: Please note some of the links in this post may be affiliate links, I will earn a commission if you decide to make a purchase. This doesn’t cost you anything additional and I truly appreciate this support, thank you!

Hi, I'm Darlene. I'm the creator, photographer, baker, recipe tester of Make Fabulous Cakes. Welcome to my sweet world!
MORE ABOUT ME >>
most popular posts
 |
 |
 |
 |
 |
 |
Recent Articles
-
Russian Piping Tips Guide plus Video
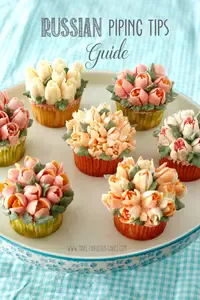 Russian Piping Tips Guide - a guide on how to use these fun tips, where to get them, which buttercream to use and how to color it plus video.
 -
Top Ten Cake Baking Tips
 Top ten cake baking tips for better cakes.
 -
Fabulous cake decorating ideas, Recipes and Cake Pictures.
Cake decorating ideas with lots of cake tutorials, cake recipes and inspiration for beginners and the more experienced cake decorator.
online Classes

Featured in:
 |
 |
 |


