Pink Ombre Ruffles Baptism Cake
I had the honor of making a cake for a friend who was having her first little baby girl baptized. This baptism cake couldn't get any more sweeter with its pink ombre ruffles and pink bows of all sizes and lots of it!
This post may contain affiliate links, which means I'll receive a commission if you purchase thru my links, at no extra cost to you. Please read the PRIVACY POLICY AND DISCLOSURE for more information.

A popular cake trend nowadays is doing ombre colors that would start dark and get lighter or the other way around. I think they are so adorable, mesmerizing even and I want to try it! I've decided to incorporate the monochromatic effect with pink fondant ruffles on the side of the cake.
TOOLS I USED
Fondant
Wilton Fondant Shaping Foam
Modelling Sticks
Pizza Wheel
Cross Cookie Cutter
X-ACTO Knife
FMM Script Tappit Cutters Set
Clay Extruder
Mini Quilter Patchwork Cutter
Ruler
Toothpick
Measuring Tape
HOW TO MAKE A SCALLOPED BORDER ON THE SIDES OF THE CAKE
Before I made the ruffles I wanted it to be somewhat scalloped. To make even scallops on the sides of the cake, measure the circumference of the cake with a sewing measuring tape. Divide the total with how many scallops you want. Mark where the highest part would be with a toothpick. Use a ruler if you want to be more accurate. For this cake, I think I made 6 or 7 scallops around it. Alternatively you can use a garland marker which would make life a lot easier.

Take something round like a cake board to make the scallops and use a toothpick to trace the semi-circle shape from one dot to the next dot. Do this all around the cake. Take the ruler and measure a half inch down from the dots and mark it with the toothpick. Do the same for all the dots and connect the dots again with the cake board. Do the same thing again one more time so this time there will be 3 sets of scalloped lines that will act as guides.

HOW TO MAKE OMBRE RUFFLES
To make the ruffles, starting with the darkest pink, cut strips of fondant about 3/4" thick.

Thin the edges with a modelling stick on foam by rolling it side to side.

Place it on the bottom scallop that has been moistened with water. Sometimes the ruffles would appear naturally but if it does not, try pleating it to have more movement. You can also place little pieces of cotton balls or tissue underneath to help form the ruffles. But don't forget to remove them!

Do the same with the next layer of ruffles, adding more white fondant for each layer to lighten the color. My ruffles were a little bit cracky and dry; I think I may have used too much cornstarch that it made my fondant dry. I could have added some shortening to my fondant. And I also may have taken too long before I got to use the strips. So it's really a good idea to keep the strips nicely covered while not in use.

I made one big large bow to go on top of the cake and mini ones to go on top of the highest point of the ruffles. Then I used an extruder to make the rope border on the bottom of the cake.
To make the plaque, I rolled out a piece of pink fondant and pressed the quilted embosser on top. I used this template to cut out the shape. There are 2 sizes on the template, use whichever one is best for your project. I used the larger size. Then I used the Tappit letter cutter for the name. I also used a cross cookie cutter with the same quilted embosser and place it on top of the cake.

And that’s it, a simple pink ombre ruffled cake perfect for a little girl’s christening!

The images, tutorials and content on make-fabulous-cakes.com are protected by copyright laws. DO NOT distribute or copy the content without written permission. DO NOT edit, crop, or remove watermarks from any image or video. If you intend to use any of the text, templates or images within, it must be linked back to this site with credit given to www.make-fabulous-cakes.com. For questions contact us HERE.
Disclosure: Please note some of the links in this post may be affiliate links, I will earn a commission if you decide to make a purchase. This doesn’t cost you anything additional and I truly appreciate this support, thank you!

Hi, I'm Darlene. I'm the creator, photographer, baker, recipe tester of Make Fabulous Cakes. Welcome to my sweet world!
MORE ABOUT ME >>
most popular posts
 |
 |
 |
 |
 |
 |
Recent Articles
-
Russian Piping Tips Guide plus Video
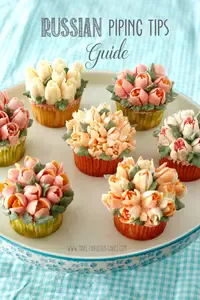 Russian Piping Tips Guide - a guide on how to use these fun tips, where to get them, which buttercream to use and how to color it plus video.
 -
Top Ten Cake Baking Tips
 Top ten cake baking tips for better cakes.
 -
Fabulous cake decorating ideas, Recipes and Cake Pictures.
Cake decorating ideas with lots of cake tutorials, cake recipes and inspiration for beginners and the more experienced cake decorator.
online Classes

Featured in:
 |
 |
 |


