- Home Page
- Cake Decorating Techniques & Tips
- Chocolate Cake Recipe
Chocolate Cake Wrap Tutorial
This
chocolate cake wrap tutorial will show you how you can easily make a beautifully
decorated chocolate finish to your cake.
This post may contain affiliate links, which means I'll receive a commission if you purchase thru my links, at no extra cost to you. Please read the PRIVACY POLICY AND DISCLOSURE for more information.

This is actually the second part of the Strawberry Mascarpone Cream Cake. Check the first part of this cake for the recipe and how to make the yummy cake part here.
Check the video I made on how to wrap a cake with chocolate but see the full instructions below.
Chocolate Cake Wrap Tutorial
YOU WILL NEED:
White chocolate coating
Red chocolate coating
parchment paper
scissors
small metal spatula
fondant smoother
INSTRUCTIONS
First thing to do is measure the cake; you will need to get the height and circumference of the cake. I know there is a certain formula to measure the circumference of the cake but honestly, I don’t remember those things anymore (or maybe I was absent that day when they taught that in school) or really care to calculate.
So, I prefer to use a string or ribbon and wrap it around the cake, and measure it from there. I added 1/2” to the height and about an inch to the circumference and cut a piece of parchment paper to those measurements. You can also use acetate in place of parchment and this will give the chocolate a shinier finish.
The cake I had was 8” and the strip of parchment
came out to about 25”-26” long. Truth be
told, when I had the chocolate on it and started putting it on the cake, it was
a bit awkward to manipulate. However, it is doable. I think 8” would be the largest cake I would do
with one continuous strip of parchment.
Anything bigger than that size I would do 2 or more strips.

Choose a design or pattern that you like for the cake. I got the pattern I used for this cake somewhere from the internets but I made this cake so long ago that I don’t have the link to the pattern anymore. (Sorry!) And try to find a seamless pattern or pattern that would look like it is continuous.
I printed the design on a regular letter size paper and taped it to the table. Then I placed the strip of parchment paper on top. You should be able to see the pattern thru the parchment.
I know the title says “chocolate” but to make our lives so much easier we are going to use chocolate-flavoured candy coating. You can use real chocolate however, real chocolate can be… well, very temperamental (and that’s why you need to “temper” it).
Chocolate coating doesn’t need to be tempered and it’s simpler to use. It can be melted in the microwave, a few seconds at a time or in a bowl on top of baine marie.
I like to use a parchment paper cone when doing some line work with chocolate. Sometimes there are little bits of unmelted chocolate that could clog up the tip. It is easier to squeeze it out with the paper cone than a metal pastry tip. You can also use a tipless pastry bag. Use the scissors to snip the end of the cone.
Start tracing the pattern on top of the parchment. I find the best way to trace or pipe a design is to place the tip of the cone on the surface, squeeze a bit of chocolate, lift the tip up a bit, squeezing at the same and let the chocolate fall on to the surface, in this case the parchment paper.
And of course the strip of parchment would be longer than the pattern printed on regular paper. So once, that part is completely done, move the parchment over and start tracing again until the whole strip of parchment is done.

Let the chocolate set almost completely before adding the other colour. You can also do the tracing on top of a tray so that you can put the tray in the refrigerator to speed the process up a bit.
Melt the other colour of chocolate but make sure it is not hot. If you spread hot chocolate on to the piped chocolate design, you might risk melting the design part and smudge your design.

Using a small metal spatula carefully spread the chocolate. Try to spread it as thinly and evenly as possible.
Let it set partially. Be careful not to let the chocolate set completely or it would get hard and it would just crack if you try to move it.

All this time the cake has been chilling in the fridge. Take the cake out and start putting the chocolate collar on it. Lift the parchment paper and place one end on the side of the cake then carefully wrap it around the cake.

When it gets to the ends, place the ends as close as you can get them, but make sure the excess is still hanging out.

Smooth it on to the cake using your hands or with a fondant smoother.
Let the wrapped cake chill in the refrigerator for a few minutes (about 15) until the chocolate has completely set.

If you want to make the chocolate hearts, now is the perfect time to do so.
To make the hearts, make some more of the
patterned chocolate and let it set slightly.
Use heart shaped cookie cutters and cut the chocolate. Let the chocolate set completely in the
refrigerator and then carefully take the hearts out.

To put it in a stick simply attach it with some melted chocolate on to the lollipop stick.

Okay, now let's go back to our cake!
Once the chocolate has set on the cake, it is time for the reveal! Use a hot knife to cut off the excess chocolate at the end of the strip then carefully peel off the parchment paper.


And voila! You have your beautiful chocolate cake wrap!
Useful tip: Use a hot knife when cutting a chocolate wrapped cake. This will give you cleaner cuts on the chocolate. Simply dip your knife in hot water, wipe the water out and cut away.

Hope you
enjoyed this tutorial. If ever you make
one, I would love to see it!
Xoxo,

Chocolate Cake Recipe ⬆
- Home Page
- Cake Decorating Techniques & Tips
- Chocolate Cake Recipe
The images, tutorials and content on make-fabulous-cakes.com are protected by copyright laws. DO NOT distribute or copy the content without written permission. DO NOT edit, crop, or remove watermarks from any image or video. If you intend to use any of the text, templates or images within, it must be linked back to this site with credit given to www.make-fabulous-cakes.com. For questions contact us HERE.
Disclosure: Please note some of the links in this post may be affiliate links, I will earn a commission if you decide to make a purchase. This doesn’t cost you anything additional and I truly appreciate this support, thank you!

Hi, I'm Darlene. I'm the creator, photographer, baker, recipe tester of Make Fabulous Cakes. Welcome to my sweet world!
MORE ABOUT ME >>
most popular posts
 |
 |
 |
 |
 |
 |
Recent Articles
-
Russian Piping Tips Guide plus Video
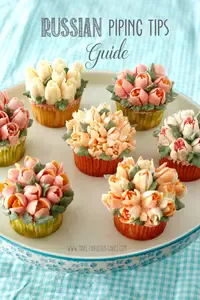 Russian Piping Tips Guide - a guide on how to use these fun tips, where to get them, which buttercream to use and how to color it plus video.
 -
Top Ten Cake Baking Tips
 Top ten cake baking tips for better cakes.
 -
Fabulous cake decorating ideas, Recipes and Cake Pictures.
Cake decorating ideas with lots of cake tutorials, cake recipes and inspiration for beginners and the more experienced cake decorator.
online Classes

Featured in:
 |
 |
 |


