|


Gum Paste Venetian Mask Tutorial
- Home Page
- Cake Decorating Techniques & Tips
- Gum Paste Venetian Mask
THIS POST MAY CONTAIN AFFILIATE LINKS, WHICH MEANS I’LL RECEIVE A COMMISSION IF YOU PURCHASE THROUGH MY LINKS, AT NO EXTRA COST TO YOU. PLEASE READ PRIVACY POLICY AND DISCLOSURE FOR MORE INFORMATION.
A few weeks back I was asked to make a masquerade theme cake by a friend in celebration of her 25th birthday. The first thing that came to my mind is that it's got to have a mask, a Venetian mask to be precise. I was very excited to do this project because I just looove Venetian masks. I find them very beautiful with so many different kinds and styles, from plain to really intricate designs.

The colors of the mask were pink and black made to match the theme of the party. I threw in a bit of gold in there for added glamour.
I wished that I had pink disco dust as the eye shadow but I could not find any disco dust locally and there wasn't enough time to order it on-line. I found some Wilton glitter dust but it did not give the shimmering effect that I wanted.
I used a plastic heart jewel that I found from the dollar store as an accent. If you want to go edible all the way, you can make your own candy jewels using a candy jewel mold. Now, I've never made these before so I search on the net and found this great tutorial for DIY candy gemstones I added some ostrich feathers to add some height and pizzaz to the mask.
I made my own template for the mask, feel free to use it but you can certainly make your own. I prefer to cut the template from card stock that regular paper because I found it easier to cut the gum paste around the card stock than the flimsy paper.
How to Make a Gum Paste Venetian Mask
YOU WILL NEED
Gum Paste
mask template
X-ACTO Knife
Luster Dust(I used gold and pink)
blank mask
royal icing
pastry bag with small round tip # 1 or 2
ostrich feathers(optional)
jewel for accent (optional)
METHOD
First print and cut out the mask template. Roll out the gum paste fairly thin. I like to smear a very thin layer of shortening on the top, just to avoid getting that wrinkly "elephant skin". Place the template on top of the gum paste and cut the shape using an X-acto knife. If you want to attach some ribbons on the side of the mask, make 2 holes by using a round tip (I used # 10).


Place the gum paste mask on top of a blank plastic mask that has been sprinkled with cornstarch. Carefully smooth out the gum paste to follow the contours of the mask. Let it dry for a day or two.

Use the luster dusts to color the mask. At first I used the luster dust mixed with lemon extract and brushed it on the mask. It really did not come out well; the colors were uneven and blotchy as you can see on the left side of the mask. I waited to let it dry a bit and dry brushed the luster dust on and it came out beautiful (check right side of the mask).

Use royal icing to pipe out some details and design on the mask. You can go crazy with how much details you want to put.

Attach the jewel with royal icing. To attach the feather, take 2 chunks of gum paste and place one in front and back of the feather. Moisten the gum paste and attach to the back of the mask.

And there you go, a life size Venetian mask for a festive feast!

Hope you enjoy making this! I will post the finished cake on my next article, so stay tuned!
Love lots,

Update: See the finished cake here.
You might also like:


Gum Paste Venetian Mask Top
- Home Page
- Cake Decorating Techniques & Tips
- Gum Paste Venetian Mask
The images, tutorials and content on make-fabulous-cakes.com are protected by copyright laws. DO NOT distribute or copy the content without written permission. DO NOT edit, crop, or remove watermarks from any image or video. If you intend to use any of the text, templates or images within, it must be linked back to this site with credit given to www.make-fabulous-cakes.com. For questions contact us HERE.
Disclosure: Please note some of the links in this post may be affiliate links, I will earn a commission if you decide to make a purchase. This doesn’t cost you anything additional and I truly appreciate this support, thank you!

Hi, I'm Darlene. I'm the creator, photographer, baker, recipe tester of Make Fabulous Cakes. Welcome to my sweet world!
MORE ABOUT ME >>
most popular posts
 |
 |
 |
 |
 |
 |
Recent Articles
-
Fabulous cake decorating ideas, Recipes and Cake Pictures.
 Cake decorating ideas with lots of cake tutorials, cake recipes and inspiration for beginners and the more experienced cake decorator.
 -
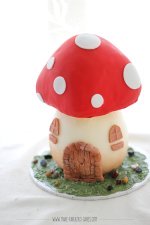
Mushroom Birthday Cake
In this Mushroom Birthday Cake tutorial, learn how to create a whimsical, mushroom-shaped cake that's perfect for enchanting any celebration. -
Swan Cake Tutorial
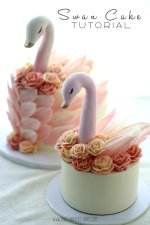 In this swan cake tutorial, you'll learn how to make a fondant swan head with buttercream roses and chocolate for feathers
online Classes

Featured in:
 |
 |
 |


