|


Pink Mad Hatter Cake
This post may contain affiliate links. Please read my privacy policy and disclosure.

I made this mad hatter cake for my dear daughter's 9th birthday a few years ago. It was a memorable cake because I made a lot of of firsts on this cake. It was the first time I tried carving a cake and covering a carved cake with fondant. It was also my first time using luster dust and making fondant ribbon roses. I took the opportunity of my daughter's birthday to practice all these firsts and I was pretty happy with how it turned out. And my daughter was really thrilled to have it too.
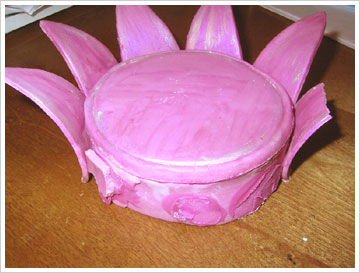
WHIMSICAL CROWN CAKE TOPPER
The whimsical crown topper has to be made ahead to allow time to dry and little accidents that may happen along the way. Ideal time to make it ahead is 1 week or more.
I mixed a little bit of gum tragacanth to the fondant to make it dry faster and harder. Roll out the fondant and using a leaf cutter, cut out a few leaves. Cut about 1.5" from the bottom to make one side straight. Save the small pieces and let those dry on a flower former. Make more of the small pieces as this will go on the bottom part of the cake. Lay the bigger pieces on a rolling pin dusted with cornstarch. Let dry.

To make the base to where the fondant leaves would be attached to, you will need a can. You can use a can of tuna or coffee or anything that you have in hand. Roll out a piece of fondant. Cut a round shape using the can as your guide. Set aside to dry. Cut a piece of fondant that is about 1" wide and the length will depend on the side of the can. Wrap around the can and join the ends together. Let dry in this position.

Once the pieces are dry, you can start putting it together. You can use royal icing or white chocolate as glue to stick them together. Or make a paste out of the same fondant that you used for making the crown. What I do is take some fondant and mix in water bit by bit until it becomes a paste.
Stick the round top to the base with the "glue". Then stick the leaves to the sides of the base. You may have to hold each piece a few minutes until it is stuck. When all the pieces are glued to the base let it dry. You can also tie around a piece of ribbon near the bottom just to secure the pieces until it is dry.
You will see in the picture below of the broken cake topper. You can get an idea of how it was made.
MAD HATTER CAKE
For the top tier, I used 6" and 7" round cakes. The 6" cake was on the bottom and the 7" on top of it.
For the bottom tier, I used two 8" and one 9" round cakes. For this cake, I made 3 flavors: strawberry, chocolate and vanilla, or Neopolitan flavors. Again the smallest cake should be at the bottom. (Cake shown below was for a different cake but I just want to show how that cake was cut.)
With a serrated knife, start carving from the top, cutting slightly on a diagonal. Repeat all around the cake.

For this mad hatter cake, you will need white and dark pink fondant. For the dark pink I used Burgundy with a bit of Deep Pink from Americolor Soft Gel Paste. Make a few fondant ribbon roses of different sizes in pink fondant. Dust with pink luster dust to add shimmer. Make a few fondant leaves and dust with green luster dust as well. These can be made ahead of time too.
Frost the cake with buttercream and place in the refrigerator to chill. Cover top tier with pink fondant and the bottom tier with white. Place the small cake on top and use dowels as support for the bottom cake.
To make the scalloped design on the bottom layer, roll out pink fondant about half the height of the cake. Take a measuring tape or a piece of string or ribbon and measure the circumference of the cake. Use a small plate as a guide to cut the scallop on one side.
Applying this to the side of the cake can get tricky because the sides are not straight. Mine did not meet up perfectly in the back . I just trimmed the excess parts and joined the ends together. You can cover it up with some flowers to make it look nicer.
I used a template to make the green scrolls on top of the pointed part of the scallops. I got this template from the scrapoboking section of a local discount store. I chose only one section of the template to make the scrolls. Use green luster dust with lemon extract and a small paint brush with the template.

Now take the small pieces of triangles that was made earlier and attach them to the edge of the scallops with royal icing. Roll out a small rope of fondant and attach on top of the triangles with royal icing to secure it in place.
Place a ribbon rose with leaves on top of each pointed segment of the scallop. Attach with royal icing.
For the top cake, I made a whimsical butterfly. First,I rolled out white fondant and cut out the shape of the butterfly. I used pieces of pink, green and orange fondant for the details. Then I used royal icing to make dotted swirly designs on the side of the cake.

Place the crown on top of the cake and add the roses and leaves.
I added a Hello Kitty topper on top of the crown because my daughter wanted that as her birthday theme. I also made my daughter's name out of a fondant rope. I originally planned to put it standing up, but it broke so I ended up placing it on the cake stand instead.


This was how the mad hatter cake looks like after the little girls attacked it.
Home Page › Kids Birthday Cakes › Pink Mad Hatter Cake
The images, tutorials and content on make-fabulous-cakes.com are protected by copyright laws. DO NOT distribute or copy the content without written permission. DO NOT edit, crop, or remove watermarks from any image or video. If you intend to use any of the text, templates or images within, it must be linked back to this site with credit given to www.make-fabulous-cakes.com. For questions contact us HERE.
Disclosure: Please note some of the links in this post may be affiliate links, I will earn a commission if you decide to make a purchase. This doesn’t cost you anything additional and I truly appreciate this support, thank you!

Hi, I'm Darlene. I'm the creator, photographer, baker, recipe tester of Make Fabulous Cakes. Welcome to my sweet world!
MORE ABOUT ME >>
most popular posts
 |
 |
 |
 |
 |
 |
Recent Articles
-
Fabulous cake decorating ideas, Recipes and Cake Pictures.
Mar 25, 24 09:44 AM
Cake decorating ideas with lots of cake tutorials, cake recipes and inspiration for beginners and the more experienced cake decorator. -
Harvest Buttercream Flowers Pumpkin Cake Online Class
Sep 14, 23 09:19 PM
 Make a beautiful Pumpkin Cake with fall themed buttercream flowers and wafer paper leaves and more!
 -
Rainbow Cupcakes
Sep 08, 23 12:13 PM
 Discover the magic of rainbow cupcakes with this colorful and delicious recipe. Taste the rainbow today!"
online Classes

Featured in:
 |
 |
 |


