|


How to Make a Car Cake
- Home Page
- Birthday Cakes
- Car Cake
THIS POST MAY CONTAIN AFFILIATE LINKS, WHICH MEANS I’LL RECEIVE A COMMISSION IF YOU PURCHASE THROUGH MY LINKS, AT NO EXTRA COST TO YOU. PLEASE READ PRIVACY POLICY AND DISCLOSURE FOR MORE INFORMATION.

To be quite honest, although I was looking forward to making this car cake, I was actually nervous about doing it. The first time I attempted making a car cake, it really didn't turn out the way I had envisioned it to be.
I wanted to make my son's favorite car, Lightning Mcqueen, from the Disney movie "Cars", for his 2nd birthday. An ambitious project for me. You see I'm a newbee when it comes to making 3D cakes. I wasn't really sure what I was getting into. And boy, I was in it for a ride.
I made a lot of mistakes on the first attempt on making a car cake. First, the cake I baked was too small. I knew I would be carving the cake but I did not foresee that carving a small cake would make it even smaller. Each time I would have to cut a part out, I would get nervous about not having enough cake left for the guests to eat.
Next, because I was pressed for time (read: lazy) I decided to paint the color on the fondant after the cake was covered with it. I do not have an airbrush and so I used a brush and painted gel color diluted with a bit of lemon extract. In some cases, painting on fondant would work but of course not on this one. Read on and you will know why.
After building my cake, I placed it in the fridge like I usually do. Then I decided to take it out so that it will be at room temperature by the time we eat it. See, that shouldn't have been a problem if it wasn't a very humid day. But then again it was the most humid day of the year. The cake started sweating profusely and the red paint started dripping right in between Lightning Mcqueen's eyes. He looked like he just came back from a bloody car fight.
I was so discouraged, I did not even take a picture of this cake. But looking back I wish I had. Oh just to have a good laugh at it. My son still loved his car cake though. He's four now and he doesn't even remember it any more (thank goodness!) The second time around is a bit better, actually way better. Still doesn't really look exactly like Lightning Mcqueen, but at least it looks more like a car.
THE BETTER WAY OF MAKING A CAR CAKE
For this cake, I used the recipe of the Ultimate Chocolate Cake . The instructions for this tutorial will be in reference to this recipe but of course, feel free to use whatever cake you want. Make 2 times the recipe of the chocolate cake and bake in a 9" X 13" sheet pan. Make one recipe and bake in an 8" square pan and the rest in the muffin pan. The cupcakes are going to be the wheels of the car.
Once the cake is baked and cooled, torte the 9" x 13" sheet cake in half and fill with desired filling. Place the 8" square cake on one side of the cake. Carve the contours of the sheet cake to give it an aerodynamic feel. Save the carvings and place on the sides of the hood.

For the roof of the car, cut the front "windshield" part on a slight angle. Cut the top part of the roof also in an angle and the sides tapering to the back. Again, save the pieces of scrap and place on the back side part. Carve if necessary. Take a 2" round cutter and press on the sides of the cake where the wheels are going to be. Use a small metal help spatula to scoop out inside the circle.

Next, crumb coat the carved cake with buttercream. Place in the refrigerator to chill.

Cover the chilled cake with red fondant and smooth it using hands and the fondant smoother, whatever works for you.

Use a veining tool to shape Lightning Mcqueen's mouth. First, make the contour of the mouth then use the tool to press inside.

The wheels are cupcakes crumbcoated with buttercream and covered with black fondant. You may need to trim the cupcakes to make it the same size of the holes made earlier. Cut a smaller round from red fondant for the "rims" of the wheel. Punch out some holes all around using a plain pastry tip. Place the wheels in the holes, use some buttercream if needed. Write out "Lightyear" with white buttercream.

For the signs on the side of the car cake, mix some yellow gel color mixed in with a bit of lemon essence or vodka and paint the "lightning". Cut out the numbers from red fondant and paint that as well. Using black buttercream, trace the contour of the lightning and the numbers.

Cut out the eyes(windshield), headlights and teeth from white fondant. For the sign "Rust-eze" on the hood, cut a round piece of brown fondant and paint the sign using the gel color mixture. The windows are painted on as well using black gel paste color.

For the spoiler in the back, use a piece of red fondant cut to fit the rear end. When I made the spoiler, I did not have enough time to let it dry so I just attached it right away. The fondant has to be quite thick and a bit on the stiff side so that it can hold up its shape. Maybe it is best to let the piece dry overnight before attaching it.
You can go all out and make all the details in the back but I ran out of steam and didn't really do anything on the back side.
So that about sums up how to make a car cake. I hope you enjoy this car cake tutorial as much as I did (the second time around that is).
CHECK IT OUT
If you want to see how you can apply this car cake tutorial to make a different kind of cake, check out how Danielle made her Batmobile cake . She's done a super job for recreating Batman's ride!
Car Cake Top ⬆
- Home Page
- Birthday Cakes
- Car Cake
The images, tutorials and content on make-fabulous-cakes.com are protected by copyright laws. DO NOT distribute or copy the content without written permission. DO NOT edit, crop, or remove watermarks from any image or video. If you intend to use any of the text, templates or images within, it must be linked back to this site with credit given to www.make-fabulous-cakes.com. For questions contact us HERE.
Disclosure: Please note some of the links in this post may be affiliate links, I will earn a commission if you decide to make a purchase. This doesn’t cost you anything additional and I truly appreciate this support, thank you!

Hi, I'm Darlene. I'm the creator, photographer, baker, recipe tester of Make Fabulous Cakes. Welcome to my sweet world!
MORE ABOUT ME >>
most popular posts
 |
 |
 |
 |
 |
 |
Recent Articles
-
Fabulous cake decorating ideas, Recipes and Cake Pictures.
Cake decorating ideas with lots of cake tutorials, cake recipes and inspiration for beginners and the more experienced cake decorator. -
Mushroom Birthday Cake
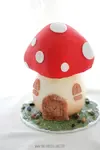 In this Mushroom Birthday Cake tutorial, learn how to create a whimsical, mushroom-shaped cake that's perfect for enchanting any celebration.
 -
Swan Cake Tutorial
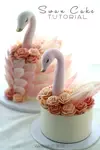 In this swan cake tutorial, you'll learn how to make a fondant swan head with buttercream roses and chocolate for feathers
online Classes

Featured in:
 |
 |
 |


