|


Birthday Cake Decorating:
Stripes and Bow
This post may contain affiliate links. Please read my privacy policy and disclosure.
Here's a birthday cake decorating idea that is fit for any birthday or special occasion. It is also a variation of my "stand-by" or "standard" cake design, a design I make when the cake requested is for something general or if I can't think of any other design.
Coming out with birthday cake ideas is sometimes hard, so this is my "go to" cake design. But really this concept can be used as an adult birthday cake or kids birthday cake or just any special occasion cake.

This birthday cake was for a man in his early 20's and hence the different shades of blues and green were used. I made another cake with the same concept of stripes and bows for a lady but that one was on a square cake with different color combinations.
This cake has a buttercream base with fondant decorations. Keep in mind to make the bow and the plaque in advance to allow it to dry.
A great thing about this birthday cake decorating idea is you can have fun with it and make different color combinations with different shapes of cake and it will never look the same.
INSTRUCTIONS FOR THE STRIPES AND BOW BIRTHDAY CAKE

For this cake I used a 12" round cake, torted, filled and frosted with buttercream . You will need fondant that is colored light blue, dark blue and lime green. For the bow, use the light blue and lime green fondant. Make the loops by rolling out the fondant and cutting it into 1" x 8" strips. Loop around a carton tube from a finished up paper towel roll. Wet the ends with a bit of water and pinch them together. Dust the carton tube with some cornstarch to avoid the fondant from sticking to it. Let dry at least overnight.
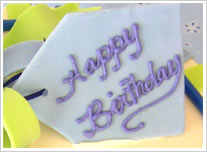
Make the plaque to write the greeting also ahead of time. Cut a rectangular shape, roughly 3" x 5", with one end cut like an arrow. On the pointy end, punch a hole using a tip #12. Let dry on a surface dusted with cornstarch at least a day but two is better.
Now, for the stripes on the sides of the cake, roll out the three colors of fondant and cut out different width sizes, ranging from 1/2" to 1". As for the length, make it the height of the cake plus 1". For this one, the cake height was 3", so I made the stripes 4" long. To make the cutting of the fondant easier, I use a ruler to measure and as a guide while I cut the fondant with a pizza roller cutter. It makes perfect strips all the time. Make extras (always!) in case of breakage.
Apply the different colored stripes to the side of the cake. Roll out the fondant into a long rope and place it on top of the cake at the edge of the stripes. I used a cookie cutter to cut out the letters of the name. You can make these ahead of time but you really don't have to. Just make sure that the name will fit on the cake. If you don't have a cutter, you can just use colored buttercream to write the celebrant's name.
Place the bow on one side of the cake. Take the fondant plaque and insert a small piece of ribbon in the hole and tie it in one of the bows. To make the plaque stand up I used one of the extra bow loop to prop it up. Write the greeting on the plaque with blue buttercream.

And there you have it, a birthday cake decorating idea that for all occasions!
You might also like:


Home Page › Adult Birthday Cakes › Birthday Cake Decorating:Stripes and Bow
The images, tutorials and content on make-fabulous-cakes.com are protected by copyright laws. DO NOT distribute or copy the content without written permission. DO NOT edit, crop, or remove watermarks from any image or video. If you intend to use any of the text, templates or images within, it must be linked back to this site with credit given to www.make-fabulous-cakes.com. For questions contact us HERE.
Disclosure: Please note some of the links in this post may be affiliate links, I will earn a commission if you decide to make a purchase. This doesn’t cost you anything additional and I truly appreciate this support, thank you!

Hi, I'm Darlene. I'm the creator, photographer, baker, recipe tester of Make Fabulous Cakes. Welcome to my sweet world!
MORE ABOUT ME >>
most popular posts
 |
 |
 |
 |
 |
 |
Recent Articles
-
Fabulous cake decorating ideas, Recipes and Cake Pictures.
Mar 25, 24 09:44 AM
Cake decorating ideas with lots of cake tutorials, cake recipes and inspiration for beginners and the more experienced cake decorator. -
Harvest Buttercream Flowers Pumpkin Cake Online Class
Sep 14, 23 09:19 PM
 Make a beautiful Pumpkin Cake with fall themed buttercream flowers and wafer paper leaves and more!
 -
Rainbow Cupcakes
Sep 08, 23 12:13 PM
 Discover the magic of rainbow cupcakes with this colorful and delicious recipe. Taste the rainbow today!"
online Classes

Featured in:
 |
 |
 |


